
Transform Your Space: The Ultimate Guide to Wall-Mounting Your Monitor Like a Pro!
In today's fast-paced world, creating an efficient and aesthetically pleasing workspace is more important than ever. One of the best ways to achieve this is by wall-mounting your monitor. Not only does this technique free up valuable desk space, but it also enhances the ergonomics of your setup, allowing for better posture and reduced neck strain. Imagine a clean, clutter-free desk with your monitor elegantly mounted on the wall at the optimal height—this transformation can greatly improve both your productivity and comfort. In this article, you will learn the essential tools and techniques needed for a successful wall-mounting installation, ensuring your setup looks professional and functions perfectly.
Why Wall-Mounting Your Monitor is Beneficial
Wall-mounting your monitor is not just a trend; it offers numerous benefits that can significantly enhance your workspace. For starters, it promotes improved ergonomics. By positioning your monitor at eye level, you can reduce the risk of developing neck and back pain caused by hunching over a desk. Additionally, wall-mounting allows for enhanced viewing angles, making it easier to share your screen with colleagues or family members without straining your neck. A clean, organized workspace is another advantage; without bulky stands cluttering your desk, you can enjoy a more spacious and aesthetically pleasing environment. Furthermore, it can help in maximizing the use of vertical space, making it ideal for smaller rooms or offices. Overall, these advantages contribute to a more productive and comfortable working experience, making wall-mounting a worthwhile investment for anyone.
Essential Tools and Materials Needed
Before you can start the installation process, it’s crucial to gather all necessary tools and materials. Here’s a list to help you prepare: first, you’ll need a wall mount specifically designed for your monitor; this will ensure proper support. A stud finder is essential for locating the wooden beams in your wall that will provide the best anchor points. You’ll also require a level to ensure your monitor is straight after installation. A drill will be necessary for creating holes in the wall, along with screws and a screwdriver to secure the mount. Finally, having a measuring tape on hand will help you accurately position your monitor at the desired height. Each of these tools plays a critical role in ensuring a secure and successful wall-mounting process.
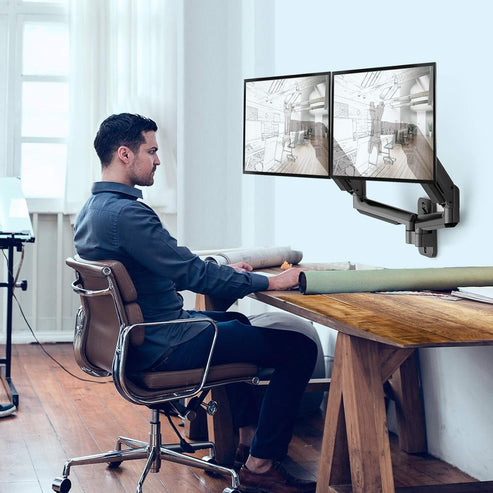
Choosing the Right Wall Mount for Your Monitor
Not all wall mounts are created equal, and selecting the right one is vital for a successful installation. There are three main types of wall mounts: fixed, tilting, and full-motion. A fixed mount is the simplest option and keeps your monitor flat against the wall, ideal for a minimalistic look. A tilting mount allows you to angle the monitor slightly downward, which can be beneficial for reducing glare. Full-motion mounts offer the most flexibility, allowing you to both tilt and swivel the monitor for optimal viewing angles. When choosing a mount, it's essential to consider the size and weight of your monitor, as well as its VESA compatibility. VESA (Video Electronics Standards Association) specifications dictate the mounting hole pattern on the back of your monitor, so ensure that the wall mount you choose matches these specifications for a secure fit.
Step-by-Step Guide to Mounting Your Monitor
Now that you have your tools and wall mount ready, it's time to dive into the installation process. First, measure the height at which you want your monitor to be mounted. A good rule of thumb is to position the monitor so that the top of the screen is at eye level when seated. Next, use your stud finder to locate the studs in your wall, marking their positions with a pencil. Once you’ve identified the stud locations, hold the wall mount bracket against the wall at your desired height and use a level to ensure it’s straight. Mark the drill points for the screws, making sure they align with the studs for stability. After confirming your measurements, drill the holes and secure the mount using screws. Finally, attach your monitor to the wall mount according to the manufacturer’s instructions. Remember to take safety precautions throughout the process, such as using a sturdy step ladder and ensuring your workspace is clear of hazards.
Finishing Touches and Cable Management
After successfully mounting your monitor, it’s time to focus on the finishing touches, particularly cable management. Neat cable management not only enhances the visual appeal of your workspace but also prevents tangling and wear on your cables. Consider using cable ties or adhesive clips to secure the cables along the wall, keeping them organized and out of sight. You can also invest in a cable cover that can be painted to match your wall color, providing a seamless look. By taking the time to manage your cables, you’ll maintain a tidy and professional appearance in your setup, further enhancing the benefits of your newly mounted monitor.
Final Thoughts on Wall-Mounting Your Monitor
In summary, wall-mounting your monitor offers numerous benefits, from improving ergonomics and viewing angles to creating a cleaner workspace. By following the essential steps outlined in this guide—such as selecting the right tools, choosing the appropriate mount, and executing the installation carefully—you can transform your space into a more efficient and stylish environment. So go ahead, take the plunge, and enjoy the satisfaction of a well-executed wall-mounted monitor setup. Your back and your workspace will thank you!