
How to Install the YC-SM06P Smart Control Panel in Your Home
Introduction
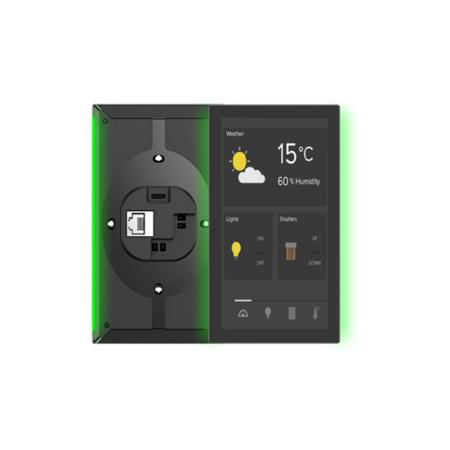
Installing the YC-SM06P is easy thanks to its universal bracket compatibility and POE support. Here's a step-by-step guide to installing your new smart home control panel.
Installation Steps
- Ensure Compatibility: The universal bracket ensures easy mounting on various wall boxes.
- POE Setup: Connect the Ethernet cable for both power and data transmission.
- Connect Wi-Fi or Bluetooth: Synchronize the panel with your other smart home devices.
- Activate LED Lights: Customize the LED light options to match your home’s aesthetic.
- Optional Sensors: Install temperature and humidity sensors if needed for enhanced control.
Conclusion
With simple installation and setup, the YC-SM06P is a hassle-free addition to your smart home system.
4 inch Smart Home Touch Control Panel
5 inch Smart Home Touch Control Panel
5.5 inch Smart Home Touch Control Panel
6 inch Smart Home Touch Control Panel
7.6 inch Smart Home Touch Control Panel
8 inch Smart Touch Control Panel
10.1 inch Smart Touch Control Panel
11.6 inch Smart Touch Control Panel
14 inch Smart Touch Control Panel
PTZ Camera Touchscreen Controller
YC-SM41P (White) 4 inch Smart Home Automation Touch Control Panel
YC-SM41P(Black)4 inch Smart Home Automation Touch Control Panel
5"Smart Home Touch Control Panel
YC-SM55P 5.5 inch Smart Home Touch Control Panel
YC-SM06P(Black) 6"Smart Home Automation Touch Control Panel with LED Light Option
YC-L76(Black)7.6″ Smart Square LCD Display Home Automation Touch Control Panel
YC-SM08M 8″ PoE Smart Home Automation Touch Control Panel
YC-SM116P(Android 11 / Linux) 11.6″ Smart Home Automation Touch Control Panel
YC-SM116P (Ubuntu)11.6 inch Smart Home Automation Touch Control Panel
YC-SM116P(Debian)11.6 inch Smart Home Touch Control Panel with RK3568
YC-PTZ10 PTZ Camera Touch Screen Controller with 3D/4D Joystick